DIY versus hiring a pro for dry rot repairs

It’s never a good feeling to find a soft spot on your deck rail or notice paint peeling off your porch trim. For homeowners in Sacramento, dry rot is a common problem that often goes unnoticed until damage is done. If you want a clear overview, the Sierra Blog explains the basics well. Dry rot is a type of wood decay caused by fungi that grow where there’s moisture and poor airflow. It might seem minor at first, but dry rot can quickly weaken wood and turn a small issue into a real safety concern.

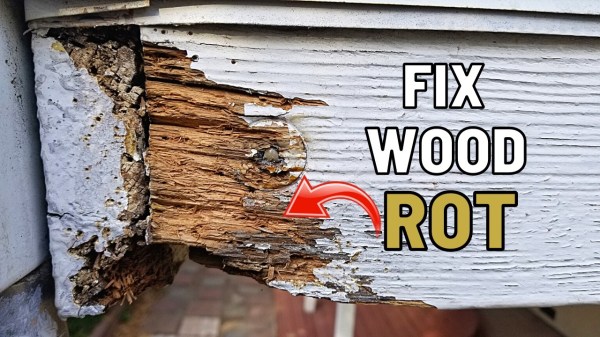
The science behind dry rot is straightforward. The fungus, known as Serpula lacrymans, needs moisture, oxygen, and wood to thrive. It sends out thin strands called hyphae that break down the wood’s structure. As a result, the wood crumbles, turns brittle, and changes color. Dry rot usually appears in dark, damp places such as under decks, behind trim, or inside porch posts. You might notice wood shrinking or cracking, paint bubbling or peeling for no clear reason, or even a musty smell. Sometimes, all it takes is a small leak for dry rot to take hold and spread fast.

Finding these warning signs early is important. Quick action can mean a simple repair. If you wait, you may face the cost and trouble of replacing large sections of wood. Dry rot is not something to ignore or put off. Acting fast can save you both time and money, and help avoid bigger structural problems later. Knowing what dry rot looks like is the first step before deciding whether to handle repairs yourself or hire a professional.

DIY Dry Rot Repair

Fixing dry rot on your own can be both rewarding and a bit risky. Some homeowners enjoy rolling up their sleeves, especially if they already have the right tools. Others might want to save money or time, especially for small jobs. Sometimes, a repair is simple enough to handle without outside help – if you know what you’re facing.

When DIY Is Enough

Here’s a quick story. Last spring, a friend in Citrus Heights found a soft spot on a stair tread leading to his deck. The damage was limited and he spotted it early, before it spread. With a little research and a simple repair kit, he cut out the bad wood, treated the area, patched it, and finished in just a few hours. He was back to grilling that evening. The main reason it worked? He caught the problem early and kept the repair small. For minor, easy-to-see patches like this, handling it yourself often makes sense.

DIY Checklist

Quick Tip: If you can see exactly where the rot stops, the damage is not deep, and the spot isn’t holding up a roof or deck, you can probably fix it yourself. If you have any doubts, reach out to a professional.

  • The rotten patch is smaller than a dinner plate
  • The wood is not part of a support beam or main structure
  • No mold, mushrooms, or deep crumbling wood are visible
  • You can reach and remove all of the damaged area

Here are the basic steps for a typical DIY dry rot repair:

  • Find and mark the rotten wood
  • Cut away all damaged material
  • Treat the area around the cut with a wood hardener or fungicide
  • Patch the hole with new wood or epoxy filler
  • Prime, paint, or seal the area to prevent future damage

These repairs don’t require special training, but you do need to work carefully. Gather a saw, chisel, dust mask, gloves, and take your time. Missing hidden rot or rushing the job could end up causing more trouble down the road. If you find the damage spreading, see signs of trouble near supports, or uncover anything unexpected, it’s safer to stop and contact a professional. The next section explains exactly when that’s the best move.

The Case for Hiring a Pro

Many homeowners feel confident grabbing a hammer to tackle dry rot repairs. Sometimes, a quick fix works. Other times, that small soft spot turns into a much bigger problem. Dry rot often hides beneath the surface, spreading quietly for years. What looks minor on the outside can mean major trouble deeper in the structure.

Dry rot doesn’t care where it starts. It can eat through support beams, posts, and joists. If you fix only what you see and miss the hidden damage, you risk bigger repairs down the line. I once met someone who replaced a few deck boards on their own. The next year, the main support beam gave out. Moisture had spread, and they ended up needing a full rebuild. If they had called a professional right away, they could have fixed just the problem area and saved a lot of money and hassle.

There’s another layer to think about: building codes and warranties. In many cities, repairs to structural parts – like beams, joists, or stairs – must meet local codes. If the work isn’t up to standard, you could run into trouble when selling your home. Professionals know the rules and make sure repairs pass inspection. Most also offer a guarantee on their work, giving you extra protection if issues come up later. That peace of mind matters.

Red Flags That Need an Expert

If you notice any of these warning signs, it’s best to call a professional:

  1. Dry rot shows up in support posts, beams, or joists (not just surface boards).
  2. The deck sags, shifts, or feels bouncy when you walk on it.
  3. Rot appears in hard-to-reach spots, like under stairs or behind siding.
  4. You’re unsure how far the damage goes, or the affected area keeps growing.
  5. The repair requires permits or inspections.

Trying to fix dry rot alone can easily turn a small repair into a major project. If you spot any of these red flags, or even just feel unsure, don’t risk it. A professional can find the real problem and fix it right the first time. Sometimes, the smartest choice is getting help from someone with the right experience.

Making the Right Choice

Choosing between fixing dry rot yourself or hiring a professional is often a balancing act. Think of it like spotting a stubborn stain on your shirt. You could try to fix it alone, but there’s always a risk of making things worse. The main things to consider are how much damage there is, your confidence with repairs, and how much risk you’re comfortable taking to save money.

If the dry rot is shallow, easy to reach, and you know your way around a chisel and some epoxy, trying it yourself can make sense. But if you see warning signs like crumbling wood, spreading soft spots, or anything from the earlier red flag list, it’s time to get help. Don’t ignore areas you can’t see or damage near stairs and railings. Safety comes first.

DIY repairs can save money and time, but only if the problem is small and you feel prepared. If anything feels off or the job seems bigger than you expected, reach out to a professional. Quick self-assessment helps: is this a simple patch or a bigger issue? When in doubt, ask for expert advice. The safest fix is the one that keeps your home strong and lets you spend your weekends doing things you actually enjoy. Listen to what the wood is telling you. If you aren’t sure, it’s always wiser to get help than to risk making the damage worse.

Make Your Storage Tanks Last Longer with These Fixes

AD_4nXe00i5qCUWHzvpajNGwjeBdDfGPOCFgX3NMK0966d6dsWxu6iHd-aNsV1F1Dw01Ib8q0FK9ZUbrtfPfCDF3i71Z4x5Uu6FbNXJz1r2YbLFxEjQfXxrUgE6q5LA-lDVG6sCoHmFP?key=ZfI1HE4i2Jph5hb1Whkbtg

Storage tanks are designed to be durable, but they aren’t invincible. Over time, even the toughest tanks begin to show signs of wear—whether from exposure to the elements, internal corrosion, or mechanical stress. But the good news is that with the right care and timely repairs, you can extend the life of your tanks significantly.

Instead of waiting for failures, smart facility managers use maintenance and repair strategies to keep tanks in top condition. A few well-planned interventions can prevent major breakdowns and add years to your equipment’s service life.

The Aging Process of Storage Tanks

Most storage tanks are made of steel or other robust materials designed to handle pressure, temperature swings, and repeated use. But constant exposure to moisture, fuel, chemicals, or temperature changes will eventually take a toll. The most common forms of tank damage include:

  • Corrosion on interior or exterior surfaces
     
  • Cracking or splitting near seams and welds
     
  • Worn linings or coatings that lose their protective barrier
     
  • Settling or shifting that causes structural stress
     
  • Leaking gaskets or fittings that compromise tank integrity
     

These issues don’t usually happen all at once. Instead, they develop slowly—until one day, the tank can’t do its job anymore.

Preventative Maintenance Works Wonders

The best way to prolong the life of a storage tank is to stay one step ahead. Routine inspections, testing, and small repairs can reduce the need for full replacements or emergency service calls.

Here are simple but effective ways to prevent premature tank failure:

  • Inspect regularly for rust, dents, or staining
     
  • Check seals and fittings for moisture or leaks
     
  • Keep surrounding areas dry and debris-free
     
  • Test gauges and sensors to ensure proper readings
     
  • Schedule annual cleaning to remove sediment and buildup
     

Preventative care keeps your tanks clean, safe, and functioning at their best. It also helps you catch minor issues before they become major headaches.

Targeted Repairs That Add Years of Use

When damage is found, timely repairs can restore strength and performance without the cost of a full replacement. The most effective repair methods include:

  • Welding repairs to fix cracks, reinforce seams, or patch corroded areas
     
  • Seal and gasket replacement to stop leaks and improve pressure control
     
  • Coating and lining restoration to protect interior surfaces from corrosive materials
     
  • Tank base adjustments if shifting has caused structural imbalance
     
  • Component upgrades, such as newer vents or valves, to improve safety and reliability
     

Each of these fixes is scalable—you can address only what’s needed without replacing the entire tank.

Learn more about how repairs like these can extend the life of your system by reviewing this detailed look at storage tank repair, including field-tested repair options and common signs to watch for.

Don’t Let Small Issues Grow

Ignoring the early signs of tank trouble can be costly. A pinhole leak may not seem urgent, but it can quickly turn into a major spill, environmental violation, or equipment shutdown.

Warning signs that your tank may need attention include:

  • Fluctuating fluid levels with no clear cause
     
  • Increased maintenance on connected systems
     
  • Visual signs of rust, pitting, or cracking
     
  • Odors, discoloration, or moisture near tank bases
     
  • Pressure changes during normal operations
     

These indicators may not stop your system immediately, but they point to weaknesses that will worsen over time.

Repair vs. Replace: Making a Smart Decision

Sometimes the right fix can buy years of additional service. Other times, the tank has simply reached the end of its life. Making that decision depends on a few factors:

  • Age of the tank: If it’s nearing or past its expected lifespan, replacement may be more economical in the long run.
     
  • Extent of damage: Widespread corrosion or multiple leak points may signal deeper problems.
     
  • Repair history: Tanks that need frequent work could be more expensive to maintain than to replace.
     
  • Regulatory compliance: Outdated tanks may not meet current environmental or safety codes.
     

When in doubt, a professional inspection can provide a clear recommendation.

Build Longevity Into Your Routine

Extending your tank’s life doesn’t require expensive systems or constant monitoring. Instead, it’s about building small, consistent habits into your regular workflow:

  • Add tank checks to your monthly maintenance list
     
  • Clean out sediment before it becomes sludge
     
  • Record inspection findings and follow up quickly on damage
     
  • Use corrosion-resistant materials in high-risk areas
     
  • Keep fittings tight, clean, and properly sealed
     

These steps don’t take much time—but they add up to big results.

A Little Repair Goes a Long Way

Your storage tanks don’t need to be replaced at the first sign of wear. With the right repair strategy and some attention to detail, they can serve your operation well beyond their expected lifespan.

By fixing problems early and focusing on long-term performance, you ensure your system stays efficient, reliable, and ready to meet the demands of daily use.

When To Call For Leaking Pipe Repair: A Handy Guide?

Daily writing prompt
Have you ever had surgery? What for?

It starts as a small drip under the sink, barely noticeable. A few weeks later, there’s a small puddle on the floor every time you run water. Now there’s water seeping into the walls and warping the cabinets. Uh oh, it’s past time to call a plumber or The Relining Company for leaking pipe repair.

But how do you know when a leak has gone from “I can ignore this” to “HIGH ALERT – call a pro immediately.”? This guide covers the signs it’s time for pipe repairs, temporary fixes to try, and when to call the pros. Arm yourself with knowledge to catch leaks early and prevent water damage.

Drips and Dampness – Time for Repairs?

Photo by Andrea Piacquadio on Pexels.com

You notice a few drips under the bathroom sink once a week – is it time for pipe repairs? Not necessarily. Here are signs a small leak may still be harmless:

  • Only leaks when tap is on – from faucet, not pipes
  • Droplets, not streaming water
  • No drips overnight or when not using
  • No moisture/stains on walls or cabinets
  • Absorbs into towel when wiped up

However, if a tiny leak is in an area that could damage wood cabinets or flooring, it’s best to call a plumber right away to be safe.

Ongoing Moisture – Take Caution

If there’s an area under the sink or along baseboards that stays damp even when the taps aren’t running, it likely means water is escaping slowly from pipes or joints. This situation calls for repairs soon.

Signs that moisture is problematic:

  • Damp spot doesn’t dry after wiping up
  • Drywall or floor feels spongy
  • Musty, mildew smell
  • Visible mold or rotting wood
  • Plaster cracking or bubbling

Don’t wait on repairs when there is ongoing moisture as serious water damage can occur. Call a plumber as soon as possible.

Major Leaks – Immediate Repairs Needed

Any time you have a major leak with water streaming steadily from pipes, it’s considered a plumbing emergency. Here are signs you need immediate repairs:

  • Water rapidly pooling under sinks or through ceilings below
  • Sudden loss of water pressure
  • Loud hissing sound of escaping water

-Visible spurting from pipe connections

  • Floors, walls, ceilings collapsing from water saturation

Major leaks require repairs ASAP. Turn off the main water supply line to the home before calling an emergency plumber to prevent flooding.

Temporary Leak Patches – Buy Time

For small drips and moisture, you may have some time to schedule a plumber rather than needing emergency repairs. Temporary fixes like these can help:

  • Place a bucket or pan under leaks to catch drips until repaired
  • Absorbent pads around damp areas to contain moisture spread
  • Apply caulking or epoxy where water beads from around pipes
  • Wrap small leaks in self-fusing silicone tape
  • Limit use of water at problematic fixtures to reduce leaks

Make sure to monitor closely and schedule professional repairs soon if moisture keeps spreading or leaks worsen.

When to Call a Professional Plumber

While temporary patches help, repairs from a licensed plumber are the only true fix for leaking pipes. Call the pros right away in these situations:

  • Leak originated from inside a wall or ceiling
  • Pipe burst or joint failure causing heavy leakage
  • Calcium deposits indicating pipe corrosion
  • Noticed dampness/mold spreading over weeks
  • Temporary fixes aren’t containing the issue

Conclusion 

Trying DIY repairs on major leaks inside walls often leads to bigger problems. Professionals have specialized tools, materials and skills to locate the leak source, repair pipes, and prevent future issues. Don’t wait until pipes fail catastrophically causing huge water damage. Call a plumber as soon as leaks pose a risk to avoid an even costlier emergency repair. Watch for the warning signs and take swift action.